Shopify
This guide will walk you through integrating Cookifi with your Shopify store.
Shopify has recently deprecated checkout scripts and other legacy tracking methods.
Currently, you can track conversions using Custom Pixels, or using third-party apps.
In this guide, we’ll go through the most common ways of tracking conversions on your store, using:
- Custom Pixels (with Google Tag Manager), or
- Google & YouTube app, or
- server-side tracking with Stape app.
This determines how you integrate Cookifi with your Shopify store.
Custom Pixels & Google Tag Manager
Section titled “Custom Pixels & Google Tag Manager”Overview
Section titled “Overview”We’ll be making changes in a few places inside Shopify.
For the purpose of this guide, we will assume
- the Custom Pixel only pushes data to the data layer, and does not directly send data to third-party vendors, and
- consent enforcement is handled by GTM (we’ll cover how to configure that later)
- you are starting from scratch with a new Custom Pixel (if you already have one, you’ll need to adapt the existing code - if unsure how, you can always reach out for help in our Discord community).
Storefront
Section titled “Storefront”Cookifi integration script
Section titled “Cookifi integration script”In your Cookifi admin panel, go to General > Integration script and copy the provided script:
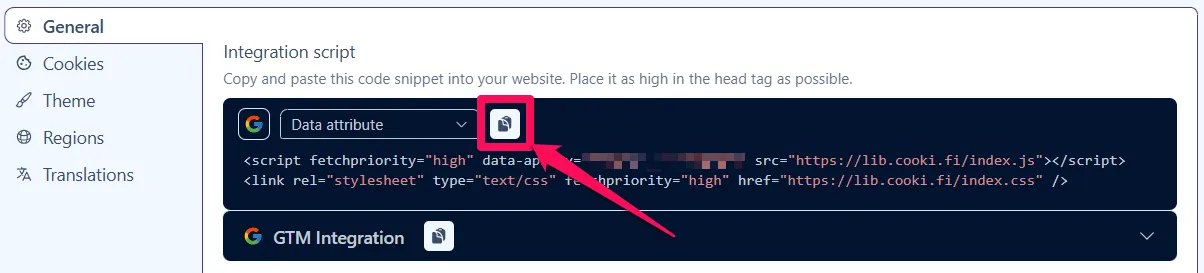
Theme.liquid file
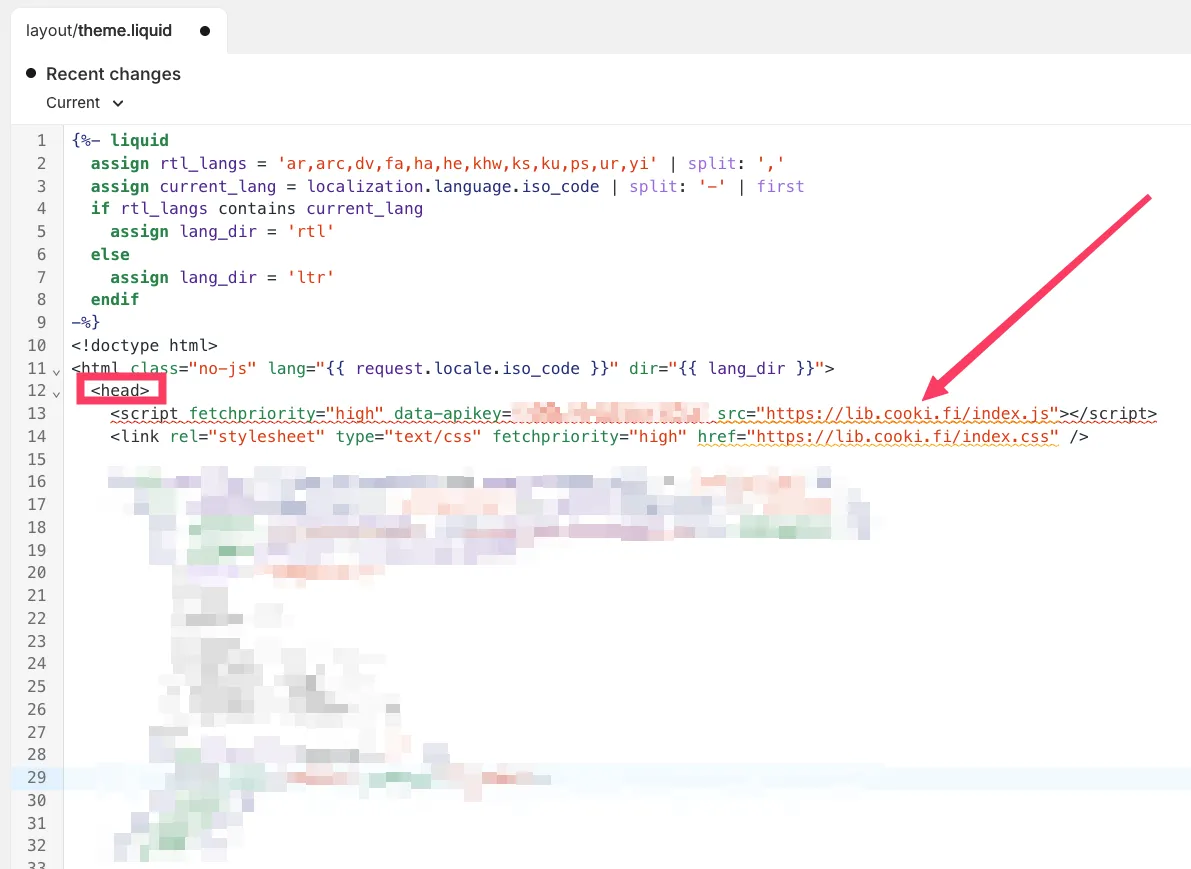
Section titled “Theme.liquid file”In Shopify, go to Online Store > Themes > Edit code, and search for the theme.liquid file.
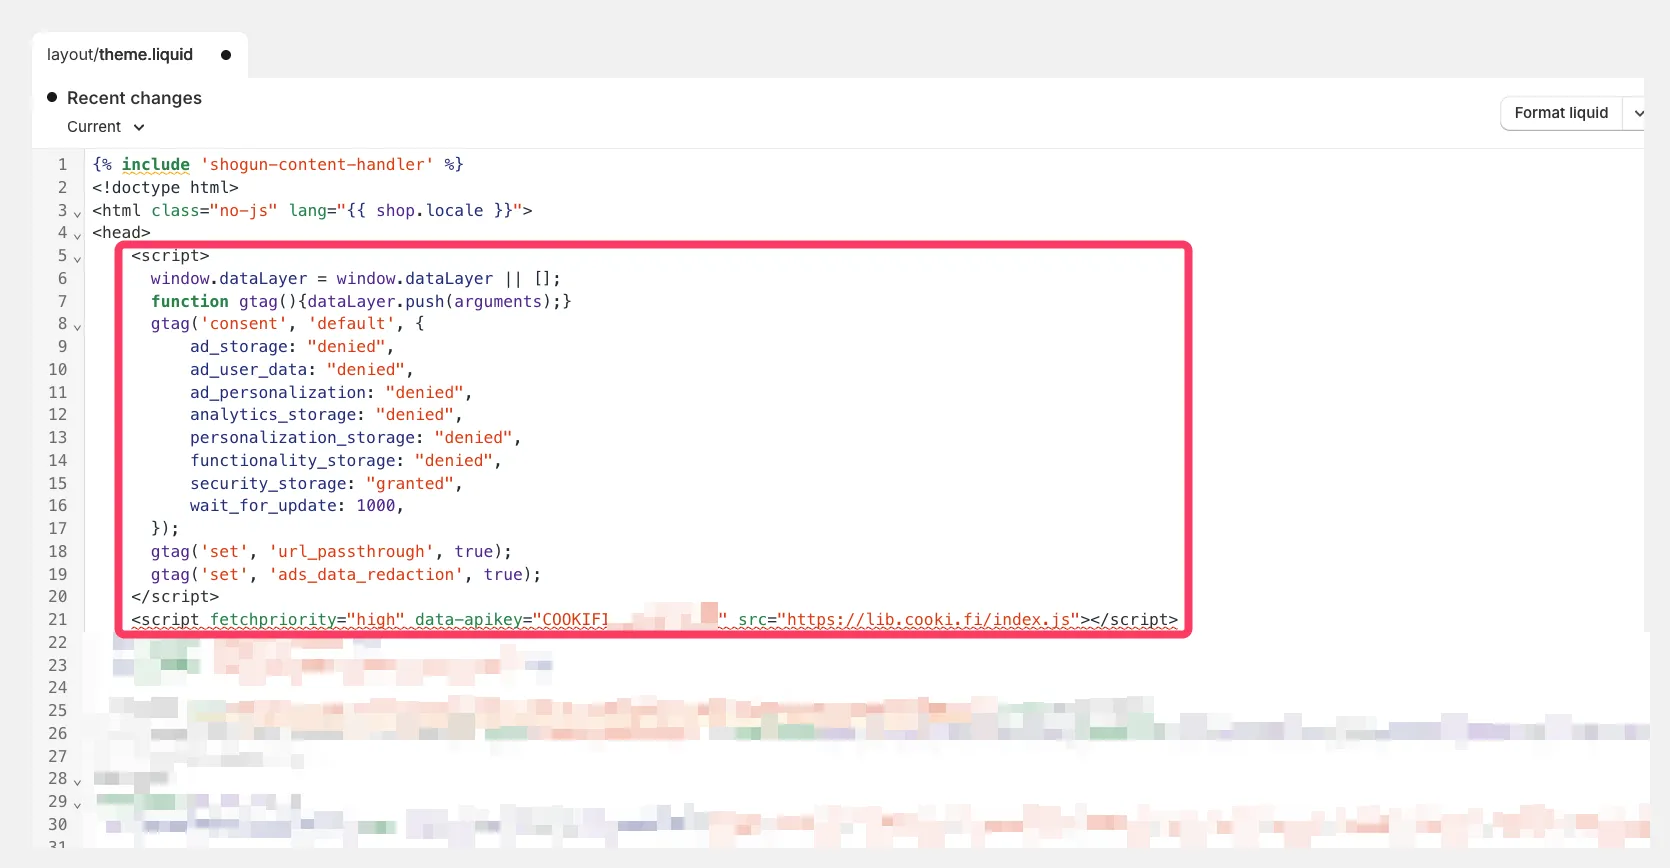
Paste your Cookifi integration script at the very top of the <head> element:
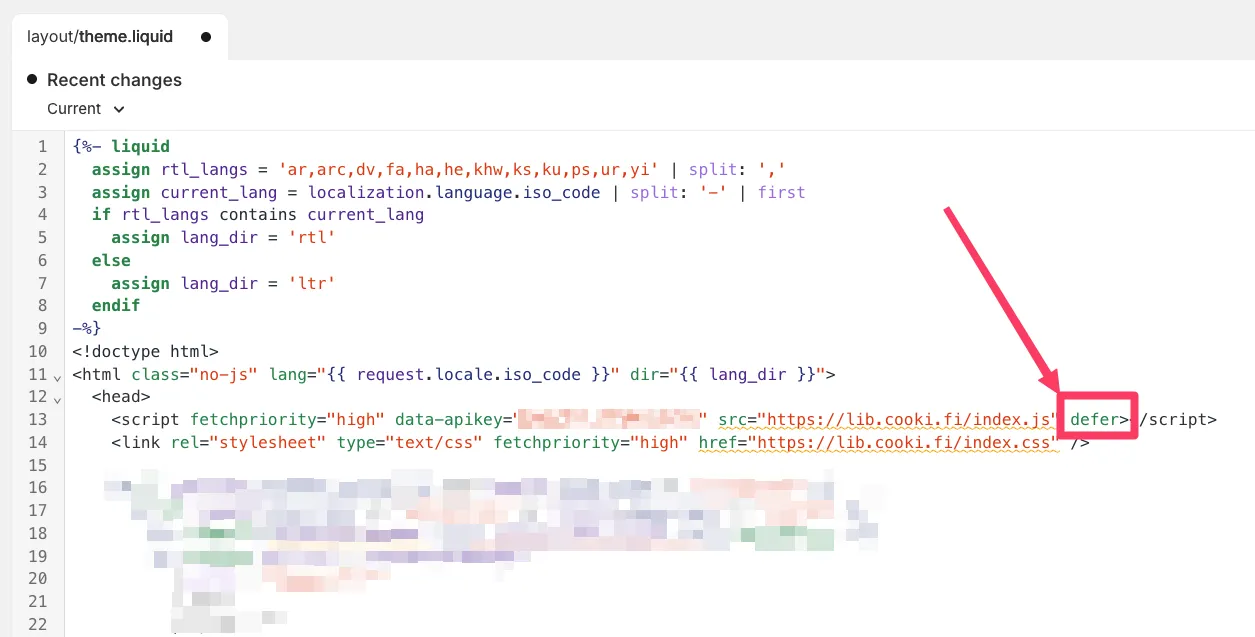
Shopify will prompt you to add defer - go ahead and add that to the <script> tag:
Now search for content_for_header and paste the following code right below it:
{% render 'cookifi' %}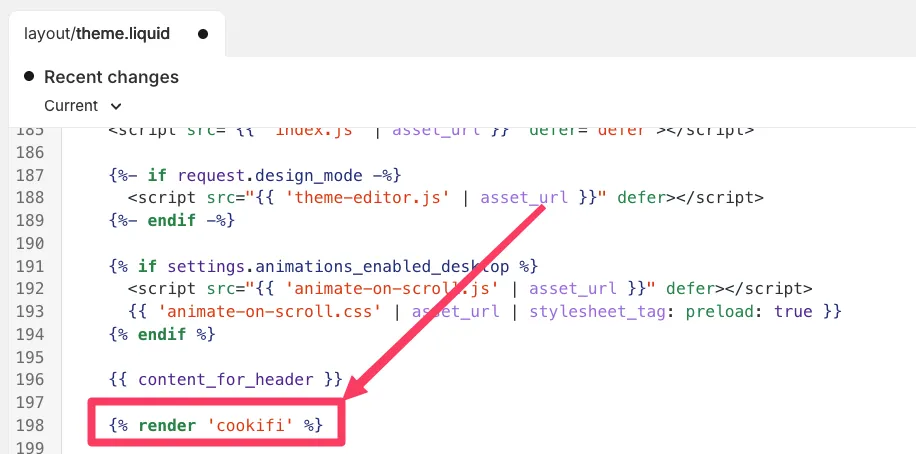
Save the file.
Cookifi snippet
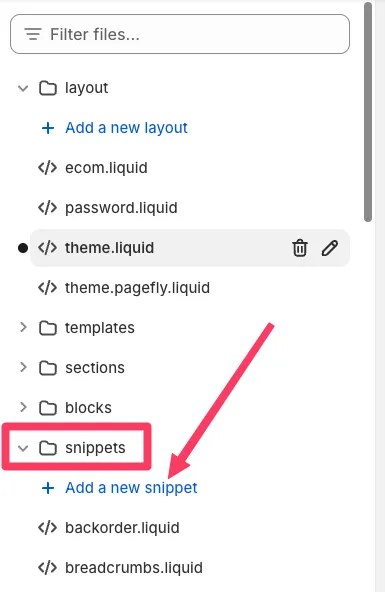
Section titled “Cookifi snippet”Within the code editor, locate the snippets section and click Add a new snippet:
Snippet name: cookifi
Snippet content:
<script>function feedback() {const p = window.Shopify.customerPrivacy;console.log(`Tracking ${p.userCanBeTracked() ? "en" : "dis"}abled`);}
window.Shopify.loadFeatures([{name: "consent-tracking-api",version: "0.1",},],function (error) {if (error) throw error;});
// function to apply Cookifi consent values to Shopify Customer Privacy APIfunction setConsent(cookifiConsent) {
console.log("<<< Cookifi: Setting consent based on Cookifi values: ", cookifiConsent);
window.Shopify.customerPrivacy.setTrackingConsent({"analytics": cookifiConsent.analytics,"marketing": cookifiConsent.marketing,"preferences": cookifiConsent.preferences,"sale_of_data": cookifiConsent.marketing,},() => console.log("<<< Cookifi: Consent sent to pixel via CustomerPrivacyAPI."));}
// Listen to Cookifi consent load eventwindow.addEventListener("cookifiOnConsentLoad", function (ev) {
const cookifiConsent = ev.detail;
console.log("<<< Cookifi: onConsentLoad event fired!");console.log("<<< Cookifi: Current consent: ", cookifiConsent);
// Wait for Shopify customerPrivacy to be available before applying consentconst existConsentShopify = setInterval(function () {if (window.Shopify.customerPrivacy) {clearInterval(existConsentShopify);setConsent(cookifiConsent);}}, 100);});
</script>
Save the snippet.
Custom Pixel
Section titled “Custom Pixel”In Shopify, navigate to Settings > Customer Events and create a new Custom Pixel:
![]()
Name the pixel, e.g. GTM, and click Add pixel.
Pixel privacy settings
Section titled “Pixel privacy settings”Under Customer privacy, choose:
Permission: Not required
Data sale: Data collected does not qualify as data sale
![]()
Pixel content
Section titled “Pixel content”First, remove the default placeholder code by Shopify.
Then, paste the following code:
// initiate dataLayer & gtagwindow.dataLayer = window.dataLayer || [];window.dataLayerTemp = [];function gtag() {dataLayer.push(arguments);}
// push events to the correct dataLayer, based on whether consent has been established (i.e., loaded from the API)function safePush(eventData) {if (isConsentLoaded) {window.dataLayer.push(eventData);} else {window.dataLayerTemp.push(eventData);}}
let isConsentLoaded = false;
// #1 TO DO: Google Consent Mode - Default command
// #2 TO DO: GTM container snippet
As you’ll notice, there’s two TO DO items for you to complete:
- Google Consent Mode - Default command
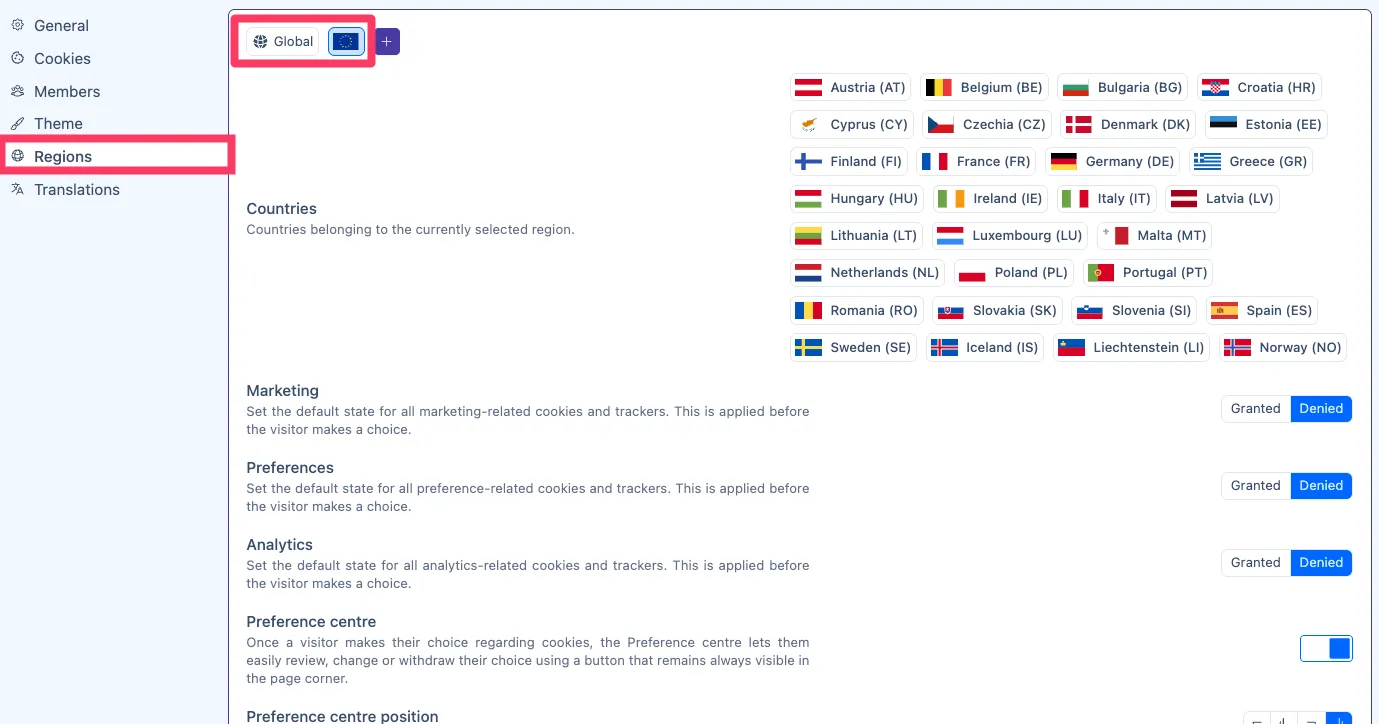
In your Cookifi admin panel, go to Regions and verify all required regions are configured correctly:
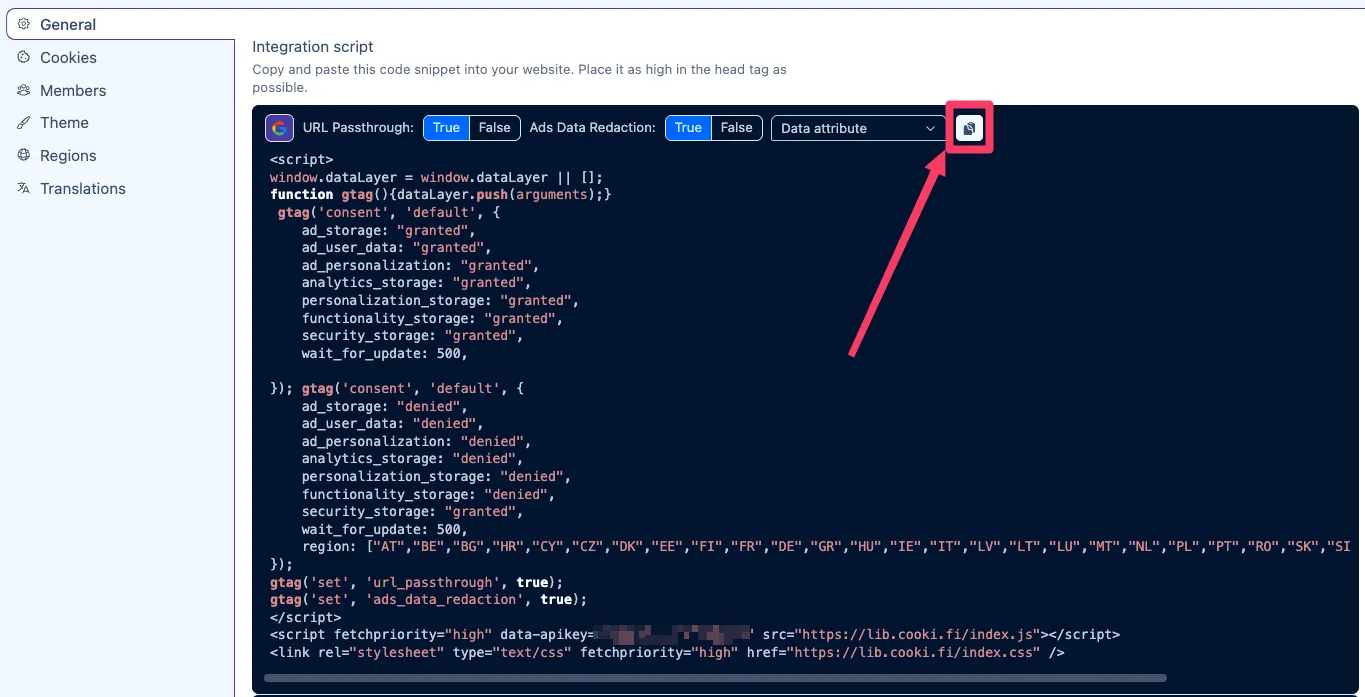
Then, go to General > Integration script and click the Google icon to generate the Default command for Google Consent Mode:
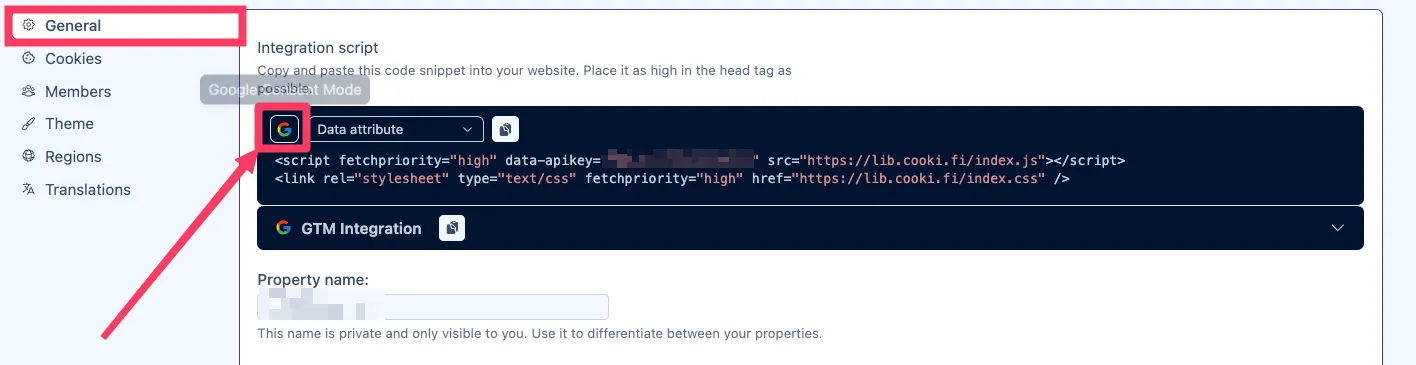
Copy the provided code:
And paste it in the Custom Pixel code, directly under the #1 TO DO comment.
Then remove these redundant lines at the top:
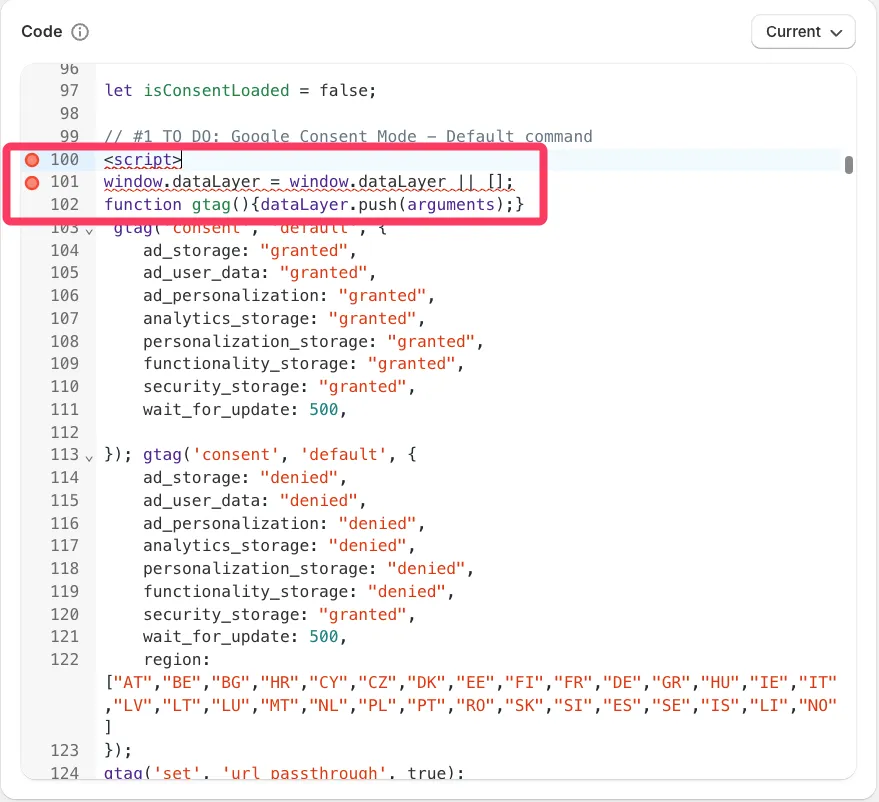
And also remove these closing lines at the bottom:
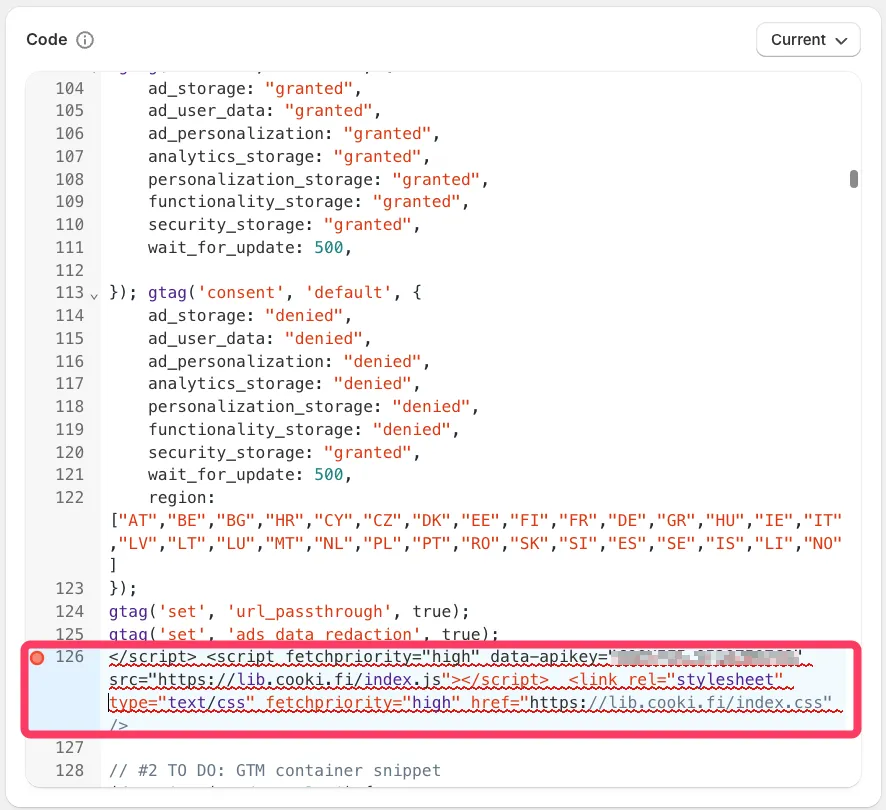
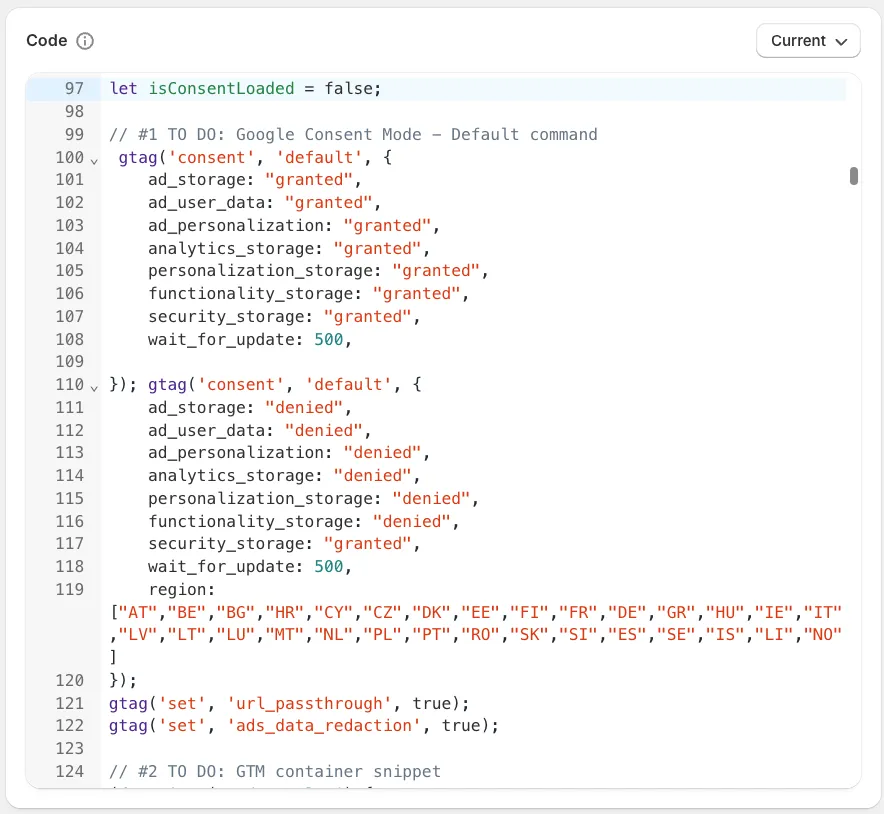
So it looks like this:
- GTM container snippet
In your GTM container, click your container ID in the top-right corner:
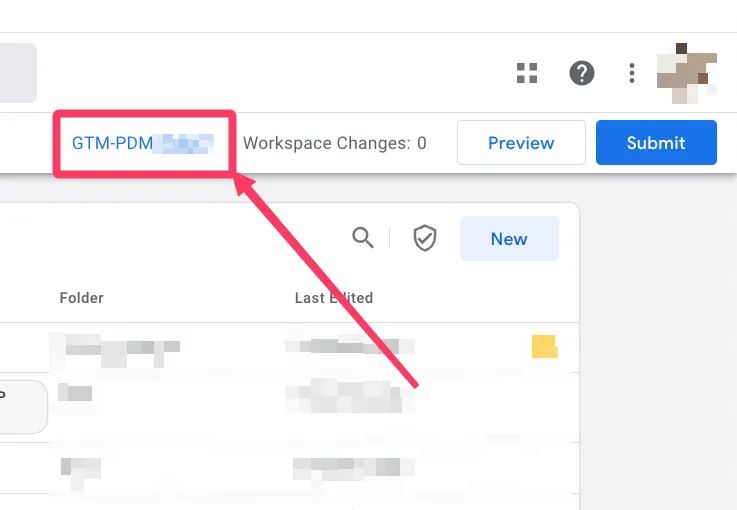
Copy the provided
headsnippet: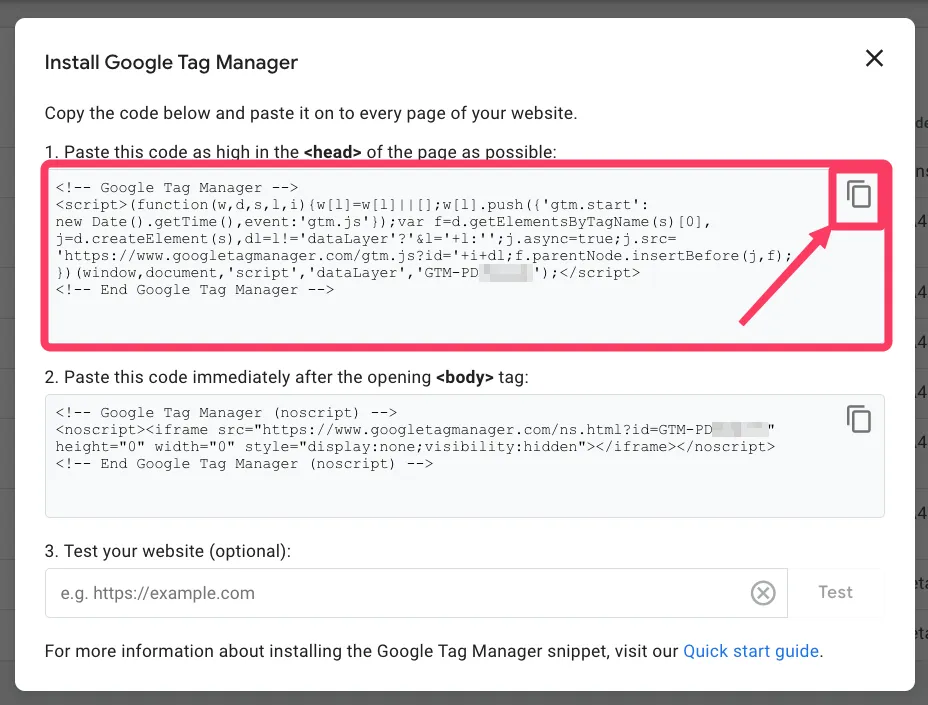
And paste it directly under the #2 TO DO comment:
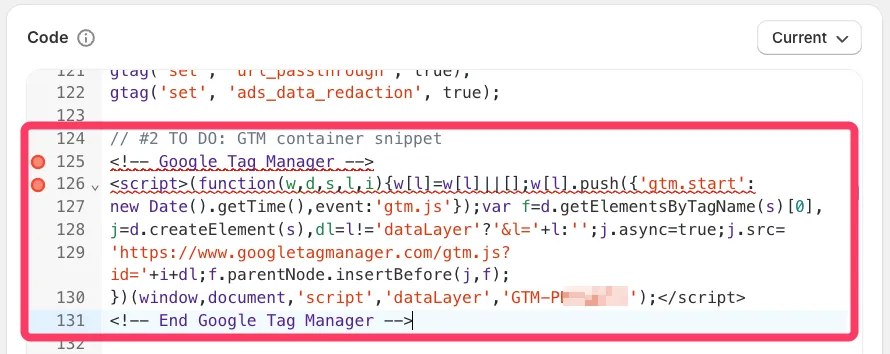
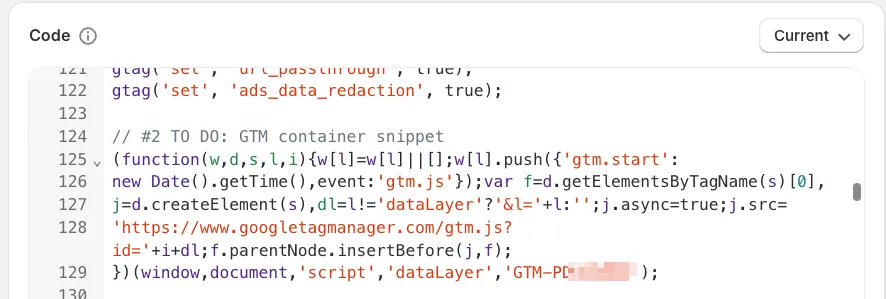
Finally, remove the
<script>tags and comment lines from the code, so that the code becomes error-free: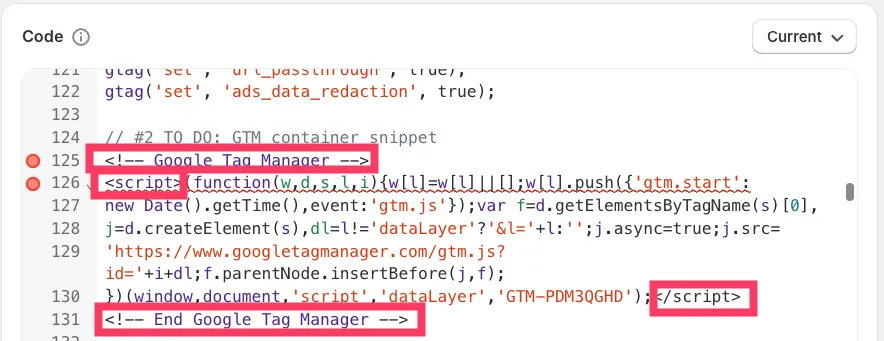
So it looks like this:
Finally, paste the following after the GTM container snippet to complete the consent sync logic:
// function to check if the current page is checkoutfunction isCheckoutPage() {return initContextData?.location?.href.includes("/checkouts/");}
// function to get the cookifi-consent cookie valuefunction getTrackingConsentCookie() {const cookie = document.cookie.split("; ").find(row => row.startsWith("cookifi-consent="));if (!cookie) return null; // no consent cookie exists
try {const cookieValue = decodeURIComponent(cookie.split("=")[1]);const consentPairs = cookieValue.split(",");const consent = {};
consentPairs.forEach(pair => {const [key, value] = pair.split(":");consent[key.trim()] = value.trim();});
return consent;} catch (error) {console.error(">>> PIXEL: Failed to parse cookifi-consent cookie: ", error);return null;}}
// handle consent on checkout pages (using the cookifi-consent cookie)if (isCheckoutPage()) {let consentCookie = getTrackingConsentCookie();let customerPrivacyStatus = {analyticsProcessingAllowed: false,marketingAllowed: false,preferencesProcessingAllowed: false,saleOfDataAllowed: false};
if (consentCookie) {customerPrivacyStatus = {analyticsProcessingAllowed: consentCookie.analytics === "true",marketingAllowed: consentCookie.marketing === "true",preferencesProcessingAllowed: consentCookie.preferences === "true",saleOfDataAllowed: consentCookie.marketing === "true"};}
// Google Consent Mode - Update commandgtag("consent", "update", {analytics_storage: customerPrivacyStatus.analyticsProcessingAllowed ? "granted" : "denied",ad_storage: customerPrivacyStatus.marketingAllowed ? "granted" : "denied",ad_user_data: customerPrivacyStatus.marketingAllowed ? "granted" : "denied",ad_personalization: customerPrivacyStatus.marketingAllowed ? "granted" : "denied",personalization_storage: customerPrivacyStatus.preferencesProcessingAllowed ? "granted" : "denied",functionality_storage: customerPrivacyStatus.preferencesProcessingAllowed ? "granted" : "denied",security_storage: "granted"});
window.dataLayer.push({event: "cookifi-consent-update",cookie_consent_marketing: customerPrivacyStatus.marketingAllowed ? "granted" : "denied",cookie_consent_statistics: customerPrivacyStatus.analyticsProcessingAllowed ? "granted" : "denied",cookie_consent_preferences: customerPrivacyStatus.preferencesProcessingAllowed ? "granted" : "denied"});
// Push queued eventswindow.dataLayerTemp.forEach(item => window.dataLayer.push(item));window.dataLayerTemp = [];
isConsentLoaded = true;}
// handle consent on storefront (using visitorConsentCollected event)if (!isCheckoutPage()) {api.customerPrivacy.subscribe("visitorConsentCollected", (event) => {let customerPrivacyStatus = event.customerPrivacy;
// Google Consent Mode - Update commandgtag("consent", "update", {analytics_storage: customerPrivacyStatus.analyticsProcessingAllowed ? "granted" : "denied",ad_storage: customerPrivacyStatus.marketingAllowed ? "granted" : "denied",ad_user_data: customerPrivacyStatus.marketingAllowed ? "granted" : "denied",ad_personalization: customerPrivacyStatus.marketingAllowed ? "granted" : "denied",personalization_storage: customerPrivacyStatus.preferencesProcessingAllowed ? "granted" : "denied",functionality_storage: customerPrivacyStatus.preferencesProcessingAllowed ? "granted" : "denied",security_storage: "granted"});
window.dataLayer.push({event: "cookifi-consent-update",cookie_consent_marketing: customerPrivacyStatus.marketingAllowed ? "granted" : "denied",cookie_consent_statistics: customerPrivacyStatus.analyticsProcessingAllowed ? "granted" : "denied",cookie_consent_preferences: customerPrivacyStatus.preferencesProcessingAllowed ? "granted" : "denied"});
// push the queued events from the temporary dataLayer to the main dataLayerwindow.dataLayerTemp.forEach(item => window.dataLayer.push(item));isConsentLoaded = true;
window.dataLayerTemp = [];});}
Subscribe to Customer Events
Section titled “Subscribe to Customer Events”Now that consent handling is in place, you can subscribe to the available standard Customer Events from Shopify.
Here’s how to do it: instead of pushing the event payload into the dataLayer directly, you’ll always use the safePush function.
Here’s an example code you can use to push a page view event:
analytics.subscribe("page_viewed", (event) => {
const eventContextData = event.context?.document;const eventPayload = {event: "page_view",page_location: eventContextData?.location?.href,page_referrer: eventContextData?.referrer,page_title: eventContextData?.title,};
safePush(eventPayload);});
This ensures that the data is only pushed once consent has been properly established.
GTM configuration
Section titled “GTM configuration”To actually send events to GA4 (or other tools) based on consent, you’ll need to configure GTM accordingly.
Please refer to this this guide for more information.
To hook to the consent update event in GTM, you can use the following event name for your Custom Event trigger:
cookifi-consent-update
Useful resources
Section titled “Useful resources”If you need an end-to-end real-world example of conversion tracking and Cookifi with ready-to-use code examples & GTM container templates compatible with Cookifi, check out this guide.
Google & YouTube app
Section titled “Google & YouTube app”Overview
Section titled “Overview”The important thing here is that you must enable the Send Consent Update command in Cookifi admin panel, otherwise this will not work.
Cookifi integration script
Section titled “Cookifi integration script”In your Cookifi admin panel, go to General > Integration script and copy the provided script:
Theme.liquid file
Section titled “Theme.liquid file”In Shopify, go to Online Store > Themes > Edit code, and search for the theme.liquid file.
Paste your Cookifi integration script at the very top of the <head> element:
Shopify will prompt you to add defer - go ahead and add that to the <script> tag:
Now search for content_for_header and paste the following code right below it:
{% render 'cookifi' %}
Save the file.
Cookifi snippet
Section titled “Cookifi snippet”Within the code editor, locate the snippets section and click Add a new snippet:
Snippet name: cookifi
Snippet content:
<script>function feedback() {const p = window.Shopify.customerPrivacy;console.log(`Tracking ${p.userCanBeTracked() ? "en" : "dis"}abled`);}
window.Shopify.loadFeatures([{name: "consent-tracking-api",version: "0.1",},],function (error) {if (error) throw error;});
// function to apply Cookifi consent values to Shopify Customer Privacy APIfunction setConsent(cookifiConsent) {
console.log("<<< Cookifi: Setting consent based on Cookifi values: ", cookifiConsent);
window.Shopify.customerPrivacy.setTrackingConsent({"analytics": cookifiConsent.analytics,"marketing": cookifiConsent.marketing,"preferences": cookifiConsent.preferences,"sale_of_data": cookifiConsent.marketing,},() => console.log("<<< Cookifi: Consent sent to pixel via CustomerPrivacyAPI."));}
// Listen to Cookifi consent load eventwindow.addEventListener("cookifiOnConsentLoad", function (ev) {
const cookifiConsent = ev.detail;
console.log("<<< Cookifi: onConsentLoad event fired!");console.log("<<< Cookifi: Current consent: ", cookifiConsent);
// Wait for Shopify customerPrivacy to be available before applying consentconst existConsentShopify = setInterval(function () {if (window.Shopify.customerPrivacy) {clearInterval(existConsentShopify);setConsent(cookifiConsent);}}, 100);});
</script>
Save the snippet.
Stape app (server-side)
Section titled “Stape app (server-side)”Overview
Section titled “Overview”The Stape app allows you to set up server-side tracking for your Shopify store. If you don’t have it installed yet, follow this guide to install Stape app on your Shopify store.
Cookifi settings & installation
Section titled “Cookifi settings & installation”In your Cookifi admin panel, go to General > Integration script and copy the provided code:
Theme.liquid file
Section titled “Theme.liquid file”In Shopify, go to Online Store > Themes > Edit code, and search for the theme.liquid file.
Paste your Cookifi installation script at the very top of the <head> element:
Shopify will prompt you to add defer - go ahead and add that to the <script> tag:

Now search for content_for_header and paste the following code right below it:
{% render 'cookifi' %}
Save the file.
Cookifi snippet
Section titled “Cookifi snippet”Within the code editor, locate the snippets section and click Add a new snippet:
Snippet name: cookifi
Snippet content:
<script>function feedback() {const p = window.Shopify.customerPrivacy;console.log(`Tracking ${p.userCanBeTracked() ? "en" : "dis"}abled`);}
window.Shopify.loadFeatures([{name: "consent-tracking-api",version: "0.1",},],function (error) {if (error) throw error;});
// function to apply Cookifi consent values to Shopify Customer Privacy APIfunction setConsent(cookifiConsent) {
console.log("<<< Cookifi: Setting consent based on Cookifi values: ", cookifiConsent);
window.Shopify.customerPrivacy.setTrackingConsent({"analytics": cookifiConsent.analytics,"marketing": cookifiConsent.marketing,"preferences": cookifiConsent.preferences,"sale_of_data": cookifiConsent.marketing,},() => console.log("<<< Cookifi: Consent sent to pixel via CustomerPrivacyAPI."));}
// Listen to Cookifi consent load eventwindow.addEventListener("cookifiOnConsentLoad", function (ev) {
const cookifiConsent = ev.detail;
console.log("<<< Cookifi: onConsentLoad event fired!");console.log("<<< Cookifi: Current consent: ", cookifiConsent);
// Wait for Shopify customerPrivacy to be available before applying consentconst existConsentShopify = setInterval(function () {if (window.Shopify.customerPrivacy) {clearInterval(existConsentShopify);setConsent(cookifiConsent);}}, 100);});
</script>
Save the snippet.
Stape Custom Pixel
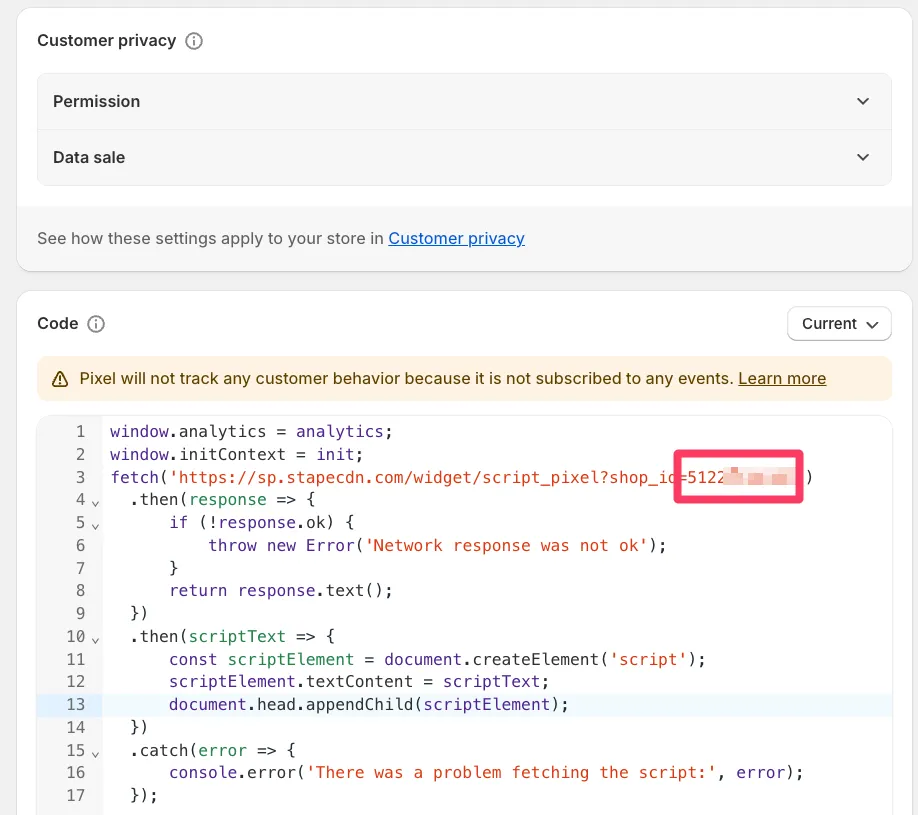
Section titled “Stape Custom Pixel”In Shopify, navigate to Settings > Customer Events and look for the Stape Custom Pixel:
![]()
Open the pixel and store your shop_id for later use:
Remove the existing code.
Then, paste the following code:
window.analytics = analytics;window.initContext = init;
function loadStapePixel() {fetch('https://sp.stapecdn.com/widget/script_pixel?shop_id=XXXXX').then(response => {if (!response.ok) {throw new Error('Network response was not ok');}return response.text();}).then(scriptText => {const scriptElement = document.createElement('script');scriptElement.textContent = scriptText;document.head.appendChild(scriptElement);}).catch(error => {console.error('There was a problem fetching the script:', error);});}
// Set Google Consent Mode defaultswindow.dataLayer = window.dataLayer || [];window.gtag = function () { dataLayer.push(arguments); };
gtag('consent', 'default', {ad_personalization: 'denied',ad_storage: 'denied',ad_user_data: 'denied',analytics_storage: 'denied',functionality_storage: 'denied',personalization_storage: 'denied',security_storage: 'granted',wait_for_update: 1000});
gtag('set', 'ads_data_redaction', true);gtag('set', 'url_passthrough', true);
// Utility: Detect if on checkoutfunction isCheckoutPage() {return init.context?.document?.location?.href.includes('/checkouts/');}
// Utility: Parse Cookifi cookiefunction getConsentFromCookie() {const cookie = document.cookie.split('; ').find(row => row.startsWith('cookifi-consent='));if (!cookie) return null; // no consent cookie exists
try {const cookieValue = decodeURIComponent(cookie.split('=')[1]);const consentPairs = cookieValue.split(',');const consent = {};
consentPairs.forEach(pair => {const [key, value] = pair.split(':');consent[key.trim()] = value.trim();});
return consent;} catch (error) {console.error('>>> PIXEL: Failed to parse cookifi-consent cookie: ', error);return null;}}
// Consent updatefunction updateConsent(consent) {const status = {analytics: consent.analytics === 'true',marketing: consent.marketing === 'true',preferences: consent.preferences === 'true'};
gtag('consent', 'update', {analytics_storage: status.analytics ? 'granted' : 'denied',ad_storage: status.marketing ? 'granted' : 'denied',ad_user_data: status.marketing ? 'granted' : 'denied',ad_personalization: status.marketing ? 'granted' : 'denied',personalization_storage: status.preferences ? 'granted' : 'denied',functionality_storage: status.preferences ? 'granted' : 'denied',security_storage: 'granted'});
loadStapePixel();}
// === Main logic ===
if (isCheckoutPage()) {const cookieConsent = getConsentFromCookie();if (cookieConsent) {updateConsent(cookieConsent);} else {// Fallback after 2ssetTimeout(loadStapePixel, 2000);}} else {// Storefront - wait for consent eventapi.customerPrivacy.subscribe('visitorConsentCollected', (event) => {updateConsent({analytics: event.customerPrivacy.analyticsProcessingAllowed ? 'true' : 'false',marketing: event.customerPrivacy.marketingAllowed ? 'true' : 'false',preferences: event.customerPrivacy.preferencesProcessingAllowed ? 'true' : 'false'});});}>
Make sure to replace XXXXX with your actual shop ID that you saved earlier.
Save the pixel.
GTM configuration
Section titled “GTM configuration”The integration with Stape app is now complete. All GA4 requests will now contain the gcs parameter with the consent state of the visitor.
Make sure to adjust your server GTM container to enforce the consent based on this parameter.
Congratulations! You have successfully integrated Cookifi with your Shopify store.